Locator
A locator map for the UP Department of Geodetic Engineering.
This training module teaches the basics of Leaflet, and introduces adding markers,
polygons, and popups, as well as multiple tile layers and layer controls.
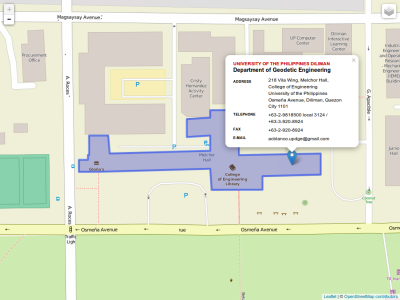
A locator map for the UP Department of Geodetic Engineering.
This training module teaches the basics of Leaflet, and introduces adding markers,
polygons, and popups, as well as multiple tile layers and layer controls.
Let’s start with our base HTML5 template:
<!DOCTYPE html>
<html>
  <head>
    <meta charset="UTF-8">
    <title>Locator</title>
  </head>
  <body>
  </body>
</html>
Before writing any code for the map, you need to do the following preparation steps on your page:
Include Leaflet CSS file in the head section of your document:
<link rel="stylesheet" href="http://cdn.leafletjs.com/leaflet/v0.7.7/leaflet.css" />Include Leaflet JavaScript file:
<script src="http://cdn.leafletjs.com/leaflet/v0.7.7/leaflet.js"></script>Put a div element with a certain id where you want your map to be:
<div id="map"></div>Style that div element using CSS as desired:
<style type="text/css">

html, body {
  margin: 0;
  padding: 0;
  height: 100%;
}

#map {
  height: 100%;
}

</style>
Now you’re ready to initialize the map and do some stuff with it.
First we’ll initialize the map and set its view to our chosen geographical coordinates and a zoom level.
We stick the following JavaScript code into a script element at the end of our HTML body.
The 'map' string refers to the ID of the div element where we want our map.
var map = L.map('map').setView([14.65651,121.07011], 17);By default (as we didn’t pass any options when creating the map instance), all mouse and touch interactions on the map are enabled, and it has zoom and attribution controls.
Note that setView() method call also returns the map object—most Leaflet methods act like this
when they don’t return an explicit value, which allows convenient jQuery-like method chaining.
Next we’ll add a tile layer to add to our map, in this case it’s the Standard OpenStreetMap tile layer. Creating a tile layer usually involves setting the URL template for the tile images, the attribution text and the maximum zoom level of the layer.
L.tileLayer('http://{s}.tile.openstreetmap.org/{z}/{x}/{y}.png', {
attribution: '© <a href="http://www.openstreetmap.org/copyright">OpenStreetMap contributors</a>',
maxZoom: 19
}).addTo(map);Make sure all the code is called after the div and leaflet.js inclusion.
That’s it! You have a working Leaflet map now!
Now we want to put a marker to mark the location of GE Department’s office. It’s as easy as the following code:
L.marker([14.65651,121.07011]).addTo(map);This creates a marker on the specified coordinates, and then immediately adds it to the map.
The map variable here refers to the variable we created earlier that references the map object.
Next, let’s add a popup that appears when the user clicks on the marker.
In order to do this clearly, we will create a variable that will store our marker object.
Then we call the bindPopup() method of the marker to register the contents of the popup.
var marker = L.marker([14.65651,121.07011]).addTo(map);
marker.bindPopup('UP Department of Geodetic Engineering');
Note that the string that you pass to bindPopup() can be in HTML code.
This let’s you customize and style the contents of the popup as you wish.
Adding a polygon is almost as easy as adding a marker. But you use an array of coordinates instead and a different Leaflet method. Here, we’ll add the outline of Melchor Hall.
var polygon = L.polygon([
    [14.65659,121.06886],[14.65671,121.06885],[14.65671,121.06872],
    [14.65658,121.06872],[14.65658,121.06871],[14.65655,121.06871],
    [14.65655,121.06865],[14.65647,121.06865],[14.65647,121.06878],
    [14.65649,121.06955],[14.65635,121.06956],[14.65635,121.06975],
    [14.65635,121.06991],[14.65644,121.06991],[14.65645,121.07031],
    [14.65659,121.07031],[14.65658,121.06975],[14.65680,121.06974],
    [14.65680,121.06974],[14.65688,121.06974],[14.65688,121.06955],
    [14.65683,121.06955],[14.65682,121.06939],[14.65670,121.06939],
    [14.65671,121.06955],[14.65663,121.06955],[14.65661,121.06955],
    [14.65661,121.06953],
]).addTo(map);
An alternate way to set the map view is to call the fitBounds() method
of the map object and passing it the polygon object.
The map view will be set such that the polygon fills as much of the viewport as possible.
In this case, there is no need for the setView() call earlier.
var map = L.map('map'); // No more setView()!!!

...

var polygon = L.polygon(...);
map.fitBounds(polygon);
Leaflet also has a built-in feature to group several layers into one, and provides a layers control element to allow users to easily switch different layers on your map.
Let’s add another base tile layer, this time the Humanitarian tileset:
var baseMap2 = L.tileLayer('http://tile-{s}.openstreetmap.fr/hot/{z}/{x}/{y}.png', {
attribution: '© <a href="http://www.openstreetmap.org/copyright">OpenStreetMap contributors</a>',
maxZoom: 19
});Notice that we created a variable to store the tile layer. Let’s do that too to our Standard layer.
var baseMap1 = L.tileLayer('http://{s}.tile.openstreetmap.org/{z}/{x}/{y}.png', {
attribution: '© <a href="http://www.openstreetmap.org/copyright">OpenStreetMap contributors</a>',
maxZoom: 19
}).addTo(map);Notice that one layer has addTo() while the other one doesn’t.
This allows us to control which tile layer is the default.
Next, let’s group the marker and polygon that we created into one layer group.
This allows us to show and remove these as one set.
We also remove the addTo() calls from the marker and polygon and put it on the group object.
var locators = L.layerGroup([marker, polygon]).addTo(map);Finally, let us set up our layer control. But first, there are two types of layers—base layers that are mutually exclusive (only one can be visible on your map), e.g. tile layers, and overlays—all the other stuff you put over the base layers. In this example, we want to switch between our two layers (Standard and Humanitarian), and to be able to toggle on and off the visibility of the marker and polygon.
To set up the layer control, we need to create two optional JavaScript basic objects. The first object refers to our base layers, and the second to our overlays. The keys of both object will be the labels, while the values of the objects will be the layer objects.
var baseMaps = {
    'Standard OSM': baseMap1,
    'Humanitarian': baseMap2
};

var overlayMaps = {
    'Locator': locators
};
Finally, we add our layer control, passing it our two new objects. Both arguments are optional—for example, you can pass just a base layers object by omitting the second argument, or just an overlays objects by passing null as the first argument.
L.control.layers(baseMaps, overlayMaps).addTo(map);And we’re done!